There’s no way I could do a blog without sharing creative projects. Creative ideas have always seemed to just flow. Growing up, I was the weird artsy kid who was busy doing paper mache & decoupage, while the neighbor kids were outside playing kickball. Fortunately, creativity, resourcefulness, and diy are the “in thing” these days, but even if they weren’t, I’d still be busy in my craft corner! Today’s project is actually an oldie that I made for my baby girl. We recently celebrated her 14th birthday. I know; she’s really not a baby! To me, she’ll forever be my “baby girl”. I was reminiscing by looking at photos from her younger years and came across a fond memory. She wanted one of those fancy princess/playhouse bunk beds that cost a LOT of money. There were several problems with her dream bed. First, she already had a bunk bed, which she shared with her big sister, who was eight years older. Second, big sister was not about to sleep in a princess bed. Third, Mom, (that’s me), was too frugal to buy such an extravagant bed. Fortunately, saying no to a thousand dollar bed did not mean that she couldn’t have her dream bed. I like being resourceful, so her wish became my challenge.
Cardboard…I love it! I collect it for future projects. (Yes, I have pack rat tendencies!) It’s flexible, yet sturdy, and can be transformed into all kinds of wonders given the right imagination. Cardboard, fabric, and hot glue were the answers to her desire.
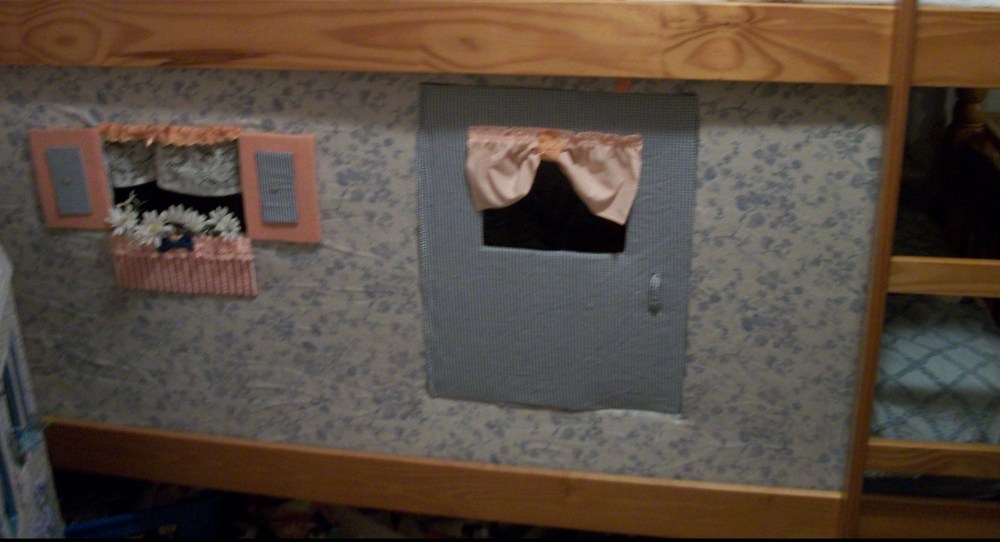
I used a large piece of cardboard, measured and cut to fit in the side bars of the bunk bed. A door opening was made by cutting just 3 sides of the door and leaving it connected to the cardboard on the fourth side. I folded that side open to make a door hinge. Two window openings were also cut out.
The cardboard house was placed face down on an old floral sheet and cut around the cottage perimeter with an extra 2 inch border on all sides. I just folded the border fabric over onto the back side of the cottage and hot glued it all the way around. I removed the fabric from the window by cutting an X diagonally from corner to corner. That fabric was also glued to the back side of the cardboard.
The same was done for the door opening, except the flap along the door hinge was trimmed down and hot glued all the way down the door hinge. The door was measured and fabric cut with an extra 2 inch border to cover it. The same technique was used again, wrapping the fabric to the back side and hot gluing. The door window was completed just like the other cottage window.

Cardboard was measured and cut for 2 shutters and a flower box. Coordinating fabrics were used to cover them, and they were glued along the window frame. I also added 2 decorative cardboard rectangles to the shutters. The stems of plastic flowers were put inside the flower box. Valances were cut for the windows and hot glued in place. I used lace and a bow to trim the flower box and window. Buttons were glued to the shutters for extra bling. It matched perfectly with the bedroom color scheme of peach and blue.

The completed comfy cardboard cottage was used for tea parties, playing with dolls, reading books, and in the evening I climbed inside and joined my daughter for a nightly Bible story and prayers. The beauty of this type of playhouse was that it could be taken out and put back as needed. When she outgrew it, we didn’t have to replace the bed, but merely removed the cardboard cottage. The idea could be adapted for a boy’s fort, pirate ship, or other fun themes.

So Cute…love the thriftiness…ingenious…Thanks for sharing!
LikeLike
Thanks, Lisa!!! Just wish I’d had better pictures; didn’t know I’d one day share. Big sister’s top bunk wasn’t made, so we couldn’t show the whole bed. Bless, not impress…keeping that goal in mind.
LikeLike